Virtually every sign I make requires jointing.
I attach each strip of wood (arranged alternately to counteract any movement) with biscuits, not custard creams but cabinetmakers biscuits which are oval pieces of ply that align the wood and also give a greater gluing area.
Each and every strip is planned to match its neighbour exactly, and planed with a concave dip in the middle so when the timber dries out the ends don’t crack. I then glue up the sign in long sash cramps overnight, making sure there are no gaps.
My long no. 7 Record jointer plane, sharpened like a razor, it makes it a pleasure to flatten the boards.
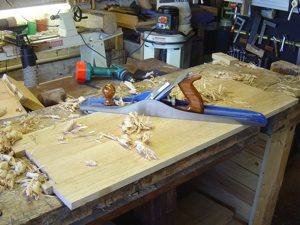
Using my 50th birthday present from my wife to scrape the surface making it ready for marking out.
The best way of marking out the letters is by computer, I used to do them by hand and it was a slow and frustrating job, as any incorrect gaps in the letters spacing and your eye automatically beams in to it. Now I use an Apple Mac to print the text, before tracing the letters out onto the sign using tracing paper, making sure you set the letters out accurately. I set mine to within 1 mm.
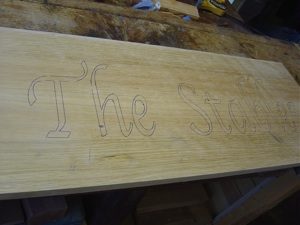
The outline of the lettering to be carved is now fully visible on the prepared board, ready to start the carving procedure.
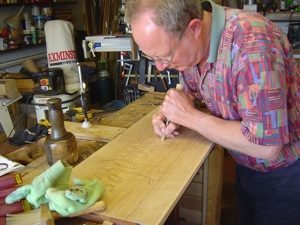
Now for the fun bit. Firstly drive an indentation into the centre line of each letter, straight chisels for the straight sections, curved gouges for the curves, following the centre line right along, being especially gentle at the ends. To carve straight sections use the widest chisel you can, line it up accurately with the mid line at an angle of 60 degrees, small tap to seat the chisel then whack! The waste moves into the gap left by the indentation. Drive the chisel down until you hit the mid point in the bottom of the channel your cutting .
Move along the line cutting slowly away allowing the chisel to rest on the side of the channel you’ve already cut out so its using the cut as a guide. Practice keeping the angle right, chop the first section out then move along pressing the chisel on the side of the channel as a guide slowly cutting away in a perfect line. Curved sections follow the same principles but use a gouge thats sweep is the same as the curve you’re cutting, the knack is to push the gouge along in a slicing action so the gouge is pushed along and also pushed round the curve, you need lots and lots of practice. If the letterform is very wide then make life easier for yourself by cutting the centre section away using a v tool.

Now you have the basic form use a raking light to highlight the edge of the letter to get the line absolutely spot on. Don’t forget this edge is what you will see on the finished product so time spent here is well rewarded. The carving part is now finished. Use diluted sanding sealer to stop the paint leaching into the wood.

Add two coats of colour.
Time to put the dust extractor on and get sanding.

Sanded sign.

All that is left is to apply the finish, which depends if it is to go indoors or outside.

Screws, rawlplugs, even little tapered wooden plugs to fit in the screw holes all supplied. Bracing struts are fitted if required. Finished item ready for delivery or collection.
If you spot an item you would like to purchase email me with all the details to andypickard50@blueyonder.co.uk. & I will get straight back to you with a PayPal invoice